- 01 What is garden bed edging, and why does it matter?
- 02 Steel, corten, timber, or brick: which raised bed edging lasts longest?
- 03 Corten and galvanised, know which suits your site
- 04 DIY garden bed edging: what you need to know
- 05 Depth consistency is the job
- 06 DIY or professional: when to call someone in
- 07 Common garden bed edging mistakes and how to avoid them
- 08 Frequently asked questions about garden bed edging
What is garden bed edging, and why does it matter?
Your garden beds might have great plants in them. But if the edge is messy, the whole area looks messy. That’s what edging fixes, it gives the garden a clean line, and it stops mulch, soil, and grass from slowly mixing into one frustrating border. Whether you’re finishing a raised bed or defining a flower border, the right raised bed edging makes the difference between a garden that looks intentional and one that just looks maintained.
Garden bed edging is the physical boundary between your garden bed and whatever’s next to it, usually lawn, gravel, paving, or a path. It can be a cut trench, brick, timber, stone, or metal. The point is always the same: it tells the garden where to stop.
Without a clear edge, mulch washes out, grass creeps in, and beds lose their shape after rain or mowing. That’s why “before and after” garden makeovers almost always start with a sharper border. If you want inspiration that ties edging into overall layout rather than just materials, this overview of garden edging ideas and design is a good place to start.
So what type of edging should you actually use? Does the material matter? And is it a proper DIY job, or one of those things that looks straightforward until you’re halfway through cursing at uneven lines? Let’s keep it practical.
3 benefits of proper garden bed edging
- Stops grass and weeds invading your beds. Grass doesn’t respect boundaries. It just expands. A clean edge won’t make your garden weed-free, but it does slow down the creep and makes it obvious where the lawn ends and the bed starts. That alone saves time, you deal with runners early instead of pulling grass out of mulch for months. If you’ve got aggressive lawn varieties, edging stops the slow takeover that happens around the borders first.
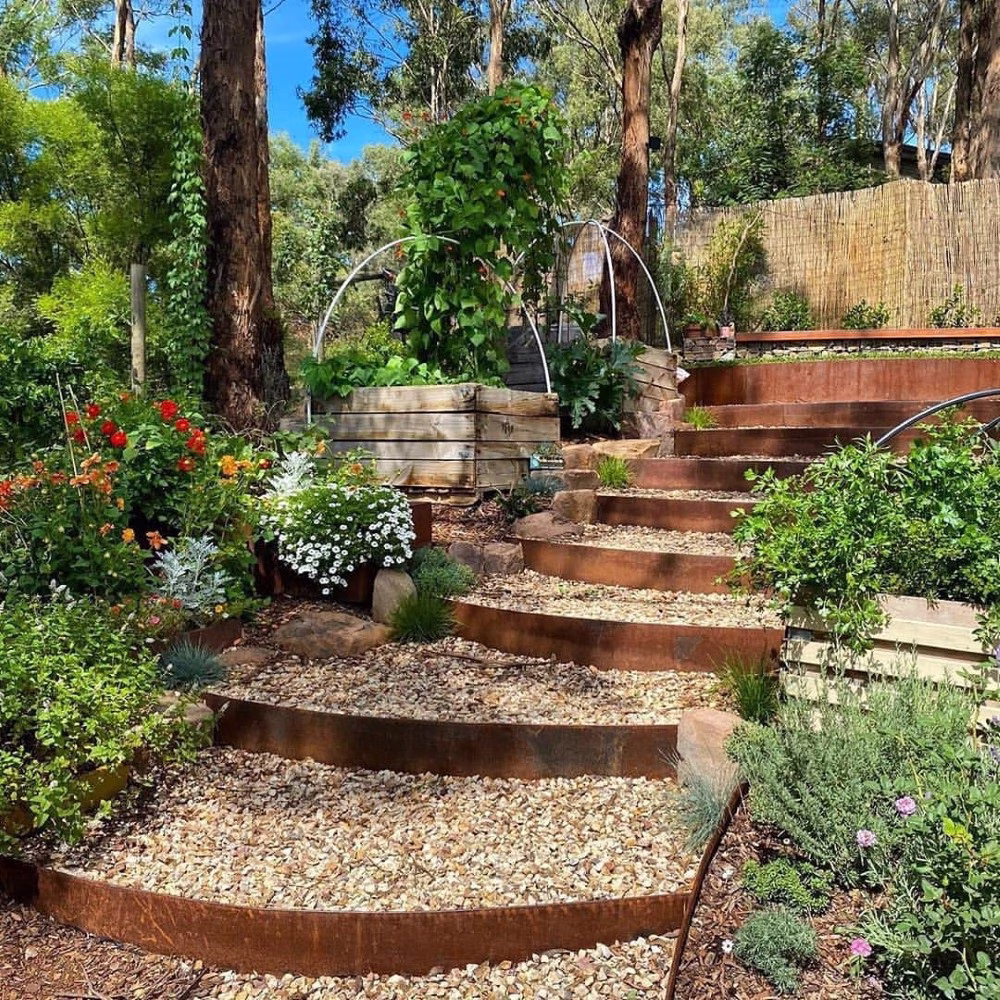
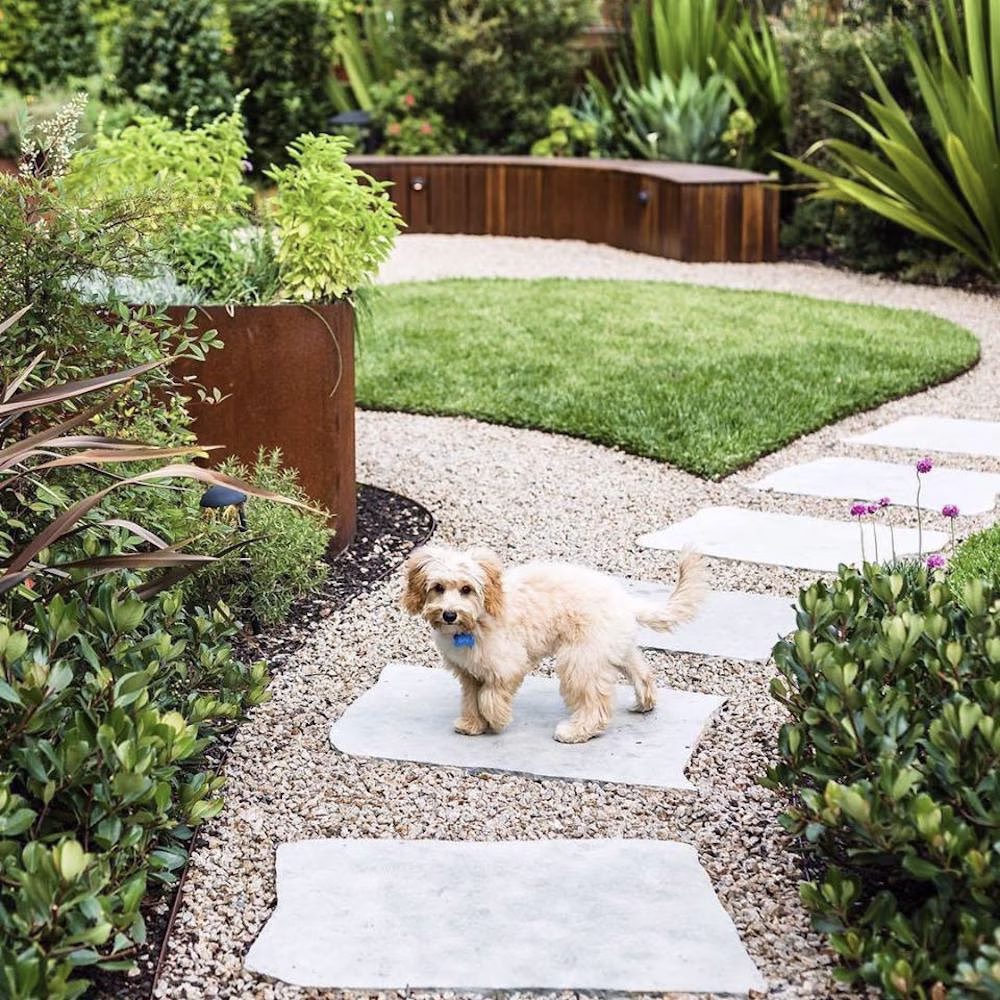
- Makes your whole garden look more intentional. You can have a simple planting plan and still make it look good if the outline is clean. Edging does that. It’s the frame around the picture. If you’re drawn to the warm, rust-toned finish you see in modern gardens, that’s usually corten steel, a weathering steel that develops a protective patina over time. More on that in the next section.
- Reduces ongoing maintenance. A proper edge means less fixing: less mulch spilling onto paths, less trimming around fuzzy borders, less re-cutting. It’s not glamorous, but it’s the kind of upgrade you notice every weekend because the garden stays tidier with less effort.
Quick Summary
Raised bed and garden bed edging defines the boundary between your beds and the surrounding lawn, path, or gravel, keeping mulch in place, stopping grass creep, and making the whole garden look more intentional. Steel and corten (weathering steel) edging consistently outperforms timber, plastic, and brick for longevity, especially in the UK’s wet conditions. DIY installation is well within reach for most gardeners, but preparation makes the difference between a clean line that lasts and one that shifts after the first wet winter.
Steel, corten, timber, or brick: which raised bed edging lasts longest?
The material you choose matters more than most people expect, especially once it’s buried in soil and exposed to UK weather. Here’s an honest comparison.
Weathering steel and corten edging
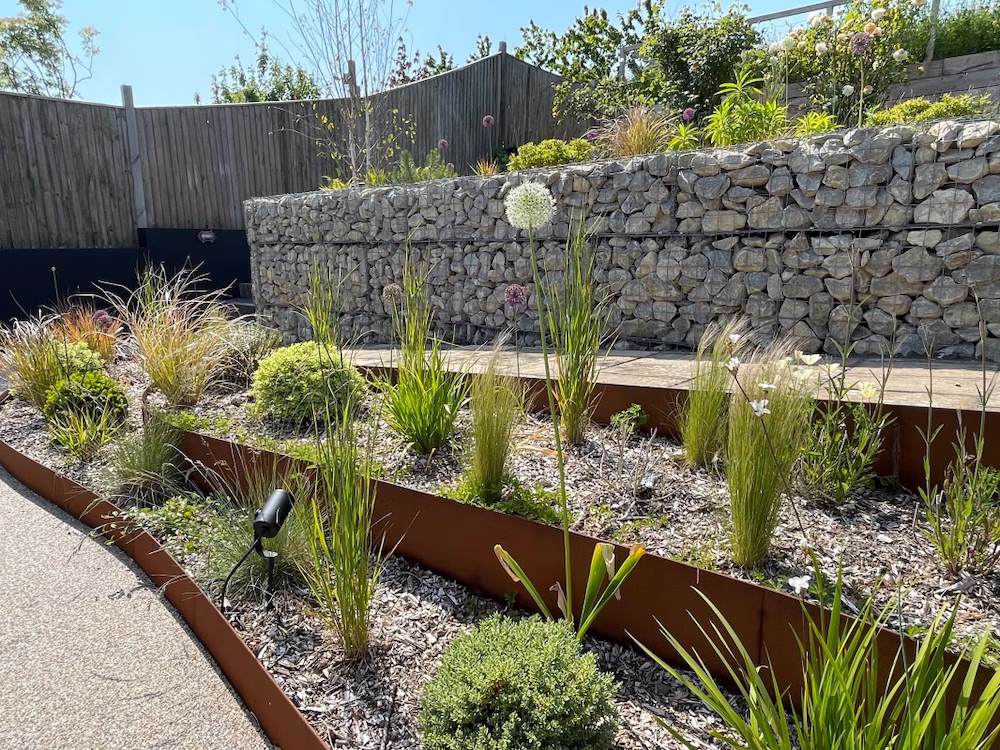
Corten and weathering steel refer to the same material, a steel alloy that, when exposed to the atmosphere, forms a stable, rust-coloured patina that protects the steel beneath. It doesn’t keep rusting indefinitely; the patina seals the surface. That’s a critical distinction: weathering steel manages rust through controlled patina formation, calling it “rust resistant” misrepresents how it works.
The UK’s climate is actually well-suited to weathering steel. The regular wet and dry cycling (rain, then dry periods) is exactly the condition the material needs to develop and stabilise its patina reliably. This makes it a strong choice for raised bed edging across most of the UK. For a full explanation of how corten and weathering steel behave over time, read the guide to common questions about weathering steel and corten.
The one condition where weathering steel needs more care is within approximately 2km of the coast, where salt air can interfere with stable patina formation. For coastal gardens, galvanised steel is a reliable alternative, not because weathering steel fails entirely, but because galvanised steel’s zinc coating is better suited to that specific environment. For detailed coastal care steps, see our Longevity Guide and Product Care Guide. If you’re planning raised beds and want to explore the full steel range, the Straightcurve raised beds range covers available heights and configurations.
Timber
Timber edging is quick to source and install, and it can look good initially. The problem is ground contact. Timber that isn’t rated for in-ground use rots within a few seasons. Even treated timber has a finite lifespan in UK soil conditions, which tend to be wetter than in many other climates. If you choose timber, use properly treated sleepers and accept that it will eventually need replacing.
Brick and concrete
Solid and long-lasting, but inflexible for curves and labour-intensive to lay properly. If the base isn’t prepared correctly, bricks migrate over time. Best suited to formal, permanent borders where a straight line won’t change.
Plastic
Fine for temporary use or very low-budget installs. Thin plastic edging pops out of the ground, fades with UV exposure, and struggles to hold a clean line under mowing pressure. Not a long-term solution.
Pro Tip
Corten and galvanised, know which suits your site
If your garden is more than 2km from the coast and you have typical well-drained UK soil, weathering steel (corten) is the default recommendation for raised bed edging. If you’re on the coast or have heavy clay or compost-rich beds with poor drainage, galvanised steel is a practical alternative for those conditions. Our Longevity Guide and Product Care Guide cover the specific steps.
DIY garden bed edging: what you need to know
DIY edging can look excellent. The problem is that most DIY edging fails for predictable, avoidable reasons: the line wasn’t marked properly, the base wasn’t compacted, the depth was inconsistent, or the material wasn’t right for the conditions. It’s rarely bad luck.
Tools you’ll need
You don’t need specialist equipment. A few basics cover most installs:
- Sharp spade or trenching shovel
- String line and pegs (or marking paint)
- Tape measure
- Rubber mallet
- Small level
- Gloves and eye protection
- Rake and broom
- Your chosen edging and the correct fixings
If your plan includes raised bed edging that also needs to hold soil back, the build needs more thought than a simple flush edge, anchoring and bracing become part of the job.
The installation sequence
- Mark the line first. String line for straight runs. Marking paint for curves. Take your time here, this is the line you’ll be looking at for years.
- Dig consistently. Depth consistency is everything. Use a straight edge or depth gauge to keep it even along the whole run. If the depth changes, the finished edge looks wavy.
- Compact the base. Loose soil under the edging means movement. Firm the base before you install.
- Secure with stakes. Follow the manufacturer’s stake spacing. Under-staking is one of the most common causes of edging shifting after the first wet season.
- Check and adjust before backfilling. Stand back and look along the line. Fix it now, not after you’ve filled in around it.
For Straightcurve edging specifically, panels click together using the connector plate system, no tools required for the joins. This makes it practical to adjust the line during installation without undoing the whole run.
Pro Tip
Depth consistency is the job
Most DIY edging problems trace back to inconsistent depth. If the trench varies by even 10–15mm, the top of the edging follows, and a wavy line is obvious once it’s in. Mark your target depth on your spade with tape before you start digging.
DIY or professional: when to call someone in
When DIY makes sense
Straightforward runs along a lawn edge, single-level raised beds, and gardens with accessible soil are all well within DIY reach. The Straightcurve modular system is designed to install with basic tools, no welding, no fabrication. If you can follow a string line and take your time on prep, you can get a clean result.
When a professional is worth it
Long edges show every mistake. A small kink becomes obvious once you’ve got ten metres of it. If your design has multiple curves, needs to align precisely with paths and paving, or involves raised bed edging holding back significant volumes of soil on a slope, an experienced installer will get it done faster and to a higher standard.
If your project involves terraces, steps, or planter walls built into a sloping garden, the edging is doing structural work, not just defining a border. That changes how it needs to be installed and anchored.
What to look for in a professional installer
Don’t just ask for a price. Ask:
- What do you do for base prep and compaction?
- How do you handle curves and corners?
- How is the edge anchored against movement?
- Can I see photos of edging work specifically?
- If I’m using steel, what will it look like over time?
A good installer can answer all of these without hesitation. Someone who can’t explain base prep is someone who skips it.
Common garden bed edging mistakes and how to avoid them
- Uneven depth: The most common DIY failure. If the depth varies along the run, the line reads as wavy. If it’s too shallow, the edging shifts after the first heavy rain or a hard frost. Dig consistently and check as you go.
- Using the wrong material for the conditions: Timber that isn’t rated for ground contact rots quickly. Thin plastic pops out. Loose bricks migrate if the base isn’t set properly. Pick the material based on your actual soil and drainage conditions, not just what looks good in a photo.
- Under-staking: Cutting back on stakes to save time is one of the most reliable ways to end up with a wavy edge after winter. Follow the manufacturer’s recommended stake spacing.
- Signs of a poor professional installation: A good edge reads as one clean line from normal viewing angles. Visible kinks or dips mean the install wasn’t done carefully. Gaps in joins are where mulch escapes and grass sneaks through, check corners and joins first when assessing any installation.
For a more detailed look at what drives long-term performance, the predictors of lifespan and longevity for steel garden edging article covers the key factors clearly.
If you’re ready to explore options, you can request a price list for product details and stockist information, or shop online for garden edging and raised beds.
Frequently asked questions about garden bed edging
What is the easiest garden bed edging for a clean finish?
If you want the fastest method, a trench edge is quick and cheap, but it needs re-cutting several times a year to stay sharp. If you want a cleaner, longer-lasting line with less ongoing maintenance, a properly installed physical edge is the better option. Steel raised bed edging, in particular, holds its line well and requires minimal intervention once it’s in.
What tools do I need to edge garden beds at home?
A sharp spade, a way to mark your line (string line or marking paint), and a tape measure cover the basics. If you’re installing physical edging material, add a rubber mallet, a small level, and the correct stakes or fixings for your chosen product. Most steel edging systems, including Straightcurve, are designed to install with standard hand tools: no specialist equipment needed.
Should I use steel, weathering steel, timber, brick, or concrete for flower bed edging?
It depends on the look you want, how permanent you need it to be, and your site conditions. Timber is quick and accessible but rots. Brick and concrete are durable but inflexible for curves. Steel and weathering steel (weathering steel) edging combines longevity, clean lines, and the ability to handle both straight runs and curves, making it the strongest all-round option for most UK raised beds and garden borders.
How do I maintain garden bed edging so it keeps looking sharp?
Top up mulch so it sits neatly against the bed side of the edge. Trim grass runners early rather than letting them cross over. After heavy rain or a hard frost, do a quick check for movement or gaps, steel edging rarely moves, but it’s worth confirming nothing has shifted at the joins. If you have a trench edge, plan to re-cut it two to three times a year.
Can I install raised bed edging on a slope?
Yes, but slope is where shortcuts show most clearly. You may need stepped sections, stronger anchoring, and sometimes a raised edge that functions more like a retaining structure. Make sure your chosen edging product is suited to the load it will be asked to carry before you start.
How do I stop weeds and grass creeping into garden bed edges?
Edging helps significantly but doesn’t stop everything by itself. The most effective combination is a clean physical edge, good mulch depth (at least 75mm), and quick trimming along the boundary when runners appear. Consistent maintenance once the edging is installed takes far less time than dealing with overgrown borders.